 ███████╗██╗     ██████╗ ██████╗ ███████╗
 ██╔════╝██║     ██╔══██╗██╔══██╗██╔════╝
 ███████╗██║     ██████╔╝██████╔╝███████╗
 ╚════██║██║     ██╔══██╗██╔══██╗╚════██║
 ███████║███████╗██████╔╝██████╔╝███████║
 ╚══════╝╚══════╝╚═════╝ ╚═════╝ ╚══════╝
Getting Searchlight BBS Running with GameSrv & NetFoss
As most Searchlight SysOps these days can tell you, the telnet functionality that is built into version 5 of SLBBS is minimally functional, at best. This functionality has degraded further as Microsoft has continued to develop its operating systems, which are now 64-bit only. Even if you are able to get the telnet feature working, slow and choppy text, lockups, door problems, and file transfer problems will more than likely plague your BBS.
The good news is that this document will provide a robust method of taking your Searchlight BBS online via telnet – even if you do not have SLBBS Version 5. In fact, as you'll see, we completely bypass the telnet code and run the DOS version of SLBBS! The only requirement is that you must be running a version of Searchlight that supports using a FOSSIL driver instead of internal COM routines for node management.
This guide was originally written in Microsoft Word format, which may have limited its audience. It includes screenshots since the work is primarily done in a Windows environment.
CONTENTS
- Windows 2003 / XP / 2000 / NT4 (server or workstation versions are fine)
- A version of Searchlight that supports FOSSIL
- GameSrv
- NetFoss
- FDSZ (if you want file transfer)
All four are also in the file library.
Where you install all of these packages is a matter of personal preference, but the paths used in this guide are listed here. Use the same paths, or substitute your own when you see them later in the document.
- Install Searchlight to C:\SLBBS
- Extract GameSrv to C:\GAMESRV-BETA
- Extract NETFOSS to C:\NETFOSS and copy the
NETFOSS.DLLfile to C:\WINDOWS\SYSTEM32 or C:\WINNT\SYSTEM32, or add C:\NETFOSS to your path. Where you go to configure the path can vary based on which version of Windows you are using. - Extract FDSZ to C:\FDSZ
To begin configuration of GameSrv, simply run the GAMESRV.EXE file that is now in the directory you decompressed to. You may need to double-click the icon down in the system tray if it opens minimized. You will probably want to put GameSrv in your Startup program group, since it needs to be running in order for your BBS to accept callers.
You should see a window that looks like the following:
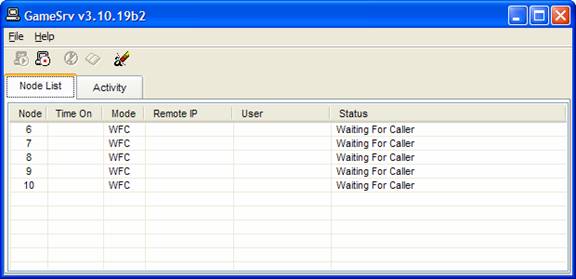
Clicking on File and then Configure will bring up the configuration window, which looks like this:
Choose Config and then General Server. Make your settings match the following:
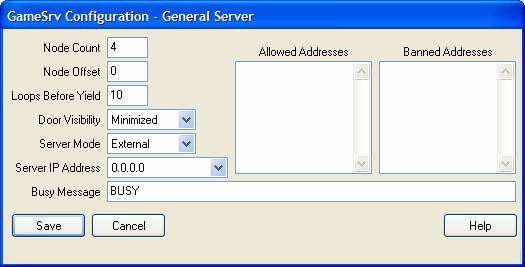
If you are going to run more than four nodes, update the node count setting to match the number of nodes you will be running. Be sure to save your settings.
Next, from the configuration screen once again, click on Config and then External Mode. Make the External Mode configuration screen match the following screen shot:
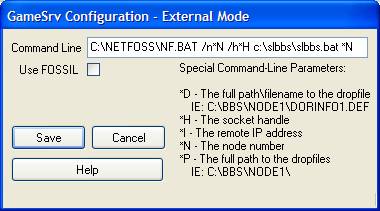
Once again, be sure to save your settings. At this point, you're done with the configuration, so you can choose File and then Exit from the configuration program. Now you can minimize GameSrv.
NETFOSS is pretty simple to configure. All you need to do is edit the C:\NETFOSS\NF.BAT file, which looks like this:
@echo off
c:\bbs\netfoss\netfoss.com
rem ** If running a non-door32.sys system, add a " %1" to end of above line **
if errorlevel 1 goto end
c:\bbs\netfoss\netcom.exe %1 %2 %3 %4 %5 %6 %7 %8 %9
c:\bbs\netfoss\netfoss.com /u
:end
Simply do what the remark statement says – add the %1 to the line directly above the remark. Also, change the NETFOSS path to match the directory that you decompressed the program to. The end result should look like this:
@echo off
c:\netfoss\netfoss.com %1
if errorlevel 1 goto end
c:\netfoss\netcom.exe %1 %2 %3 %4 %5 %6 %7 %8 %9
c:\netfoss\netfoss.com /u
:end
This document only goes into detail on the configuration necessary to get Searchlight communicating with NETFOSS. Configuration of the actual BBS is beyond its scope; see the SLBBS support site and the Searchlight documentation in the file library for more help.
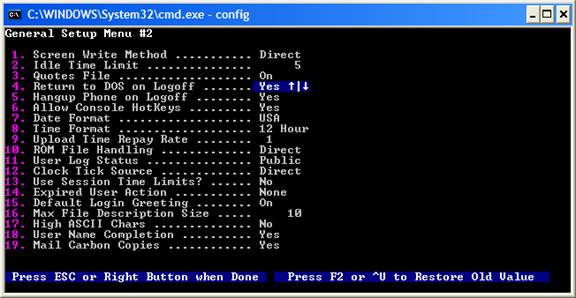
There are only a couple of changes to make. First, run CONFIG.EXE to get into your BBS configuration. From the menu, go into General Configuration, and then General Setup #2. Change option 4, Return to DOS on Logoff, to Yes. This is depicted below:
The only other change you need to make is in the General Configuration program under Communications Setup. Once there, configure your first node to look like the following:
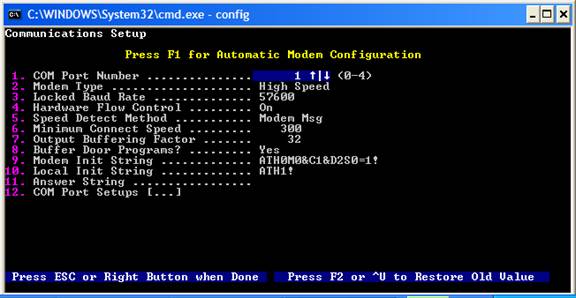
You can use this same configuration – even the same COM port number – with each additional node. Multinode setup with Searchlight is beyond the scope of this document, but the procedure is explained in detail in the Searchlight documentation. Four nodes have been run successfully under this configuration. It should be possible to run more, but that has not been tested.
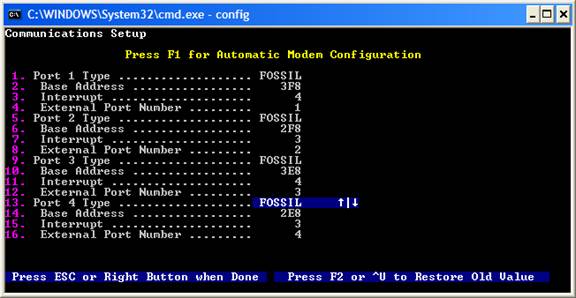
Now, from this screen, choose option 12, COM Port Setups. Change all of the port types to FOSSIL, as shown below:
Finally, create a C:\SLBBS\SLBBS.BAT file that GameSrv will call. The following batch file will suffice for four nodes. If you have more than four nodes, be sure to create your batch file to handle them:
@echo off

IF "%1" == "1" GOTO NODE1
IF "%1" == "2" GOTO NODE2
IF "%1" == "3" GOTO NODE3
IF "%1" == "4" GOTO NODE4
goto END

:NODE1
set slbbs=c:\slbbs
cd\slbbs
slbbs.exe 57600 1440 /C
goto END

:NODE2
set slbbs=c:\slbbs\node2
cd\slbbs\node2
..\slbbs.exe 57600 1440 /C
goto END

:NODE3
set slbbs=c:\slbbs\node3
cd\slbbs\node3
..\slbbs.exe 57600 1440 /C
goto END

:NODE4
set slbbs=c:\slbbs\node4
cd\slbbs\node4
..\slbbs.exe 57600 1440 /C
goto END

:END
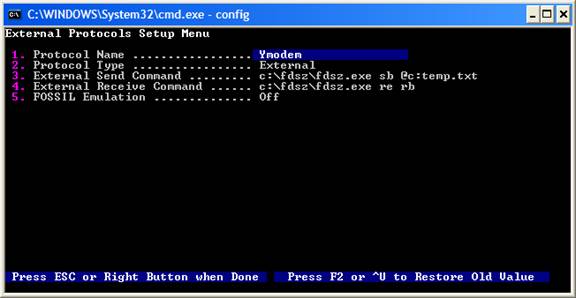
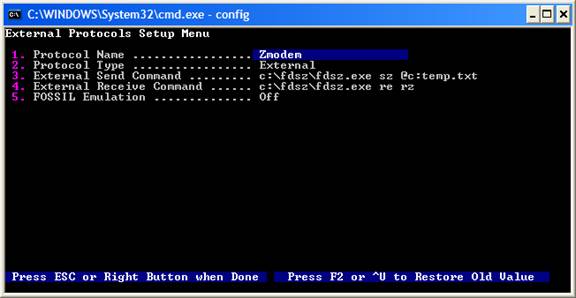
Before long, you'll probably notice that file transfers do not work properly using Searchlight's internal protocols. Fortunately, you can get file transfers to work using FDSZ, which is specifically designed to use FOSSIL drivers.
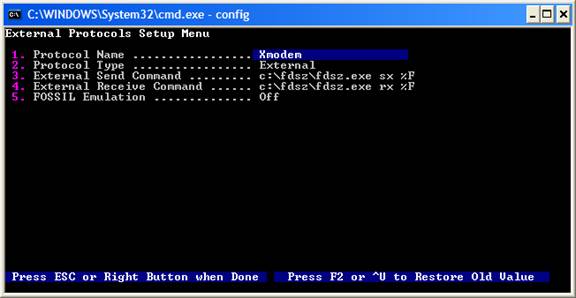
In Searchlight's CONFIG.EXE, go to General Configuration, and then XFer Protocols Setup. You will be setting up Xmodem, Ymodem, and Zmodem. Remove all the other protocols. Your configurations for Xmodem, Ymodem, and Zmodem should be set up as follows:
Congratulations! You should have your Searchlight BBS online via telnet at this point. Hopefully this guide provided you with everything you needed to get your board online.
Need another file? Head back to the file library.